Do you have tired, achy feet? Are you a dancer and always looking for ways to increase your toe point? Or possibly, you have a history of weak ankles, or history of spraining your ankle, and would like to do some exercises to strengthen and stabilize them and prevent future injury.
There are plenty of muscles that we can work on to help any or all of the above concerns.
What muscles affect our feet?
For the most part, a group of extrinsic muscles are responsible for our feet:
- Tibialis posterior (inner arch)
- Tibialis anterior (inner arch)
- Peroneus longus (transverse arch)
- Peroneus brevis (outer arch)
Sometimes referred to as the ‘stirrup muscles’ (or you’ll hear about ‘slings’), they wrap around the outside of your ankle to balance your body weight correctly over your feet and achieve the best-looking line as you work your maximum pointe.
As you rise up, your base becomes smaller (less foot on the ground and therefore less stable). This smaller surface of contact makes it more likely that you’ll roll in or out, distorting the line eg. sickle (and increasing your chances of spraining an ankle!)
Let’s look at how to work these muscles and stabilize!
Practicing Élevé with a Ball:
- On flat feet, place a ball in between the feet near the heels.
- With a small squeeze, slowlyrise up to demi-pointe (the balls of your feet), moving through each section of the foot gradually. Actively maintain your alignment by focusing on keeping your weight balanced as you rise up and down.Avoiding rolling into the big toes or out towards the pinky toes.
- Slowly lower down for a count of 3 seconds with the same tension on the ball. By slowly working on the negative you activate the muscles eccentrically which better promotes strength & length at the same time. Repeat 20 times.
Resisted Range of Motion (Plantarflexion):
- Wrap the resistance band around the ball your foot.
- Pull both ends of the band up towards yourself to maintain tension in the resistance band.
- Point your ankle and then your toes in a straight line, continuing the line down from your shin. Try not to let your ankle roll in or out during this plantarflexion exercise. Repeat up to 50x.
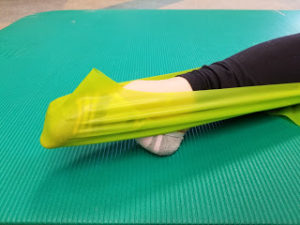
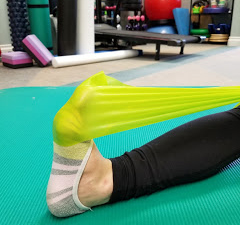
Resisted Range of Motion (Inversion):
- Wrap the resistance band around your foot (remember the darker the colour of your resistance band generally means the harder the level of resistance!) I’ve chosen a green, which is a light-medium resistance, and wrapped it around twice so I don’t worry about my foot sliding out of the band).
- Hold both ends of the band towards the outside of your foot (in this case, I was exercising my right foot, so I held the band in my right hand, out away from the right side of my body).
- Option A: If you are working on ankle stability and strengthening, pull your foot INWARDS (Inversion) into the resistance of the band, or in this case, towards the left. Vary the amount of plantarflexion and dorsiflexion (how much you are pointing your toes) while you do this. Repeat up to 50x.Option B: If you are strictly working on your toe pointe, you must first plantarflex or point your toe in a straight line continuing down from your shin, before you add the INWARDS (Inversion) contraction of your foot. Repeat your inversion repetitions whilst holding your strong toe pointe. Repeat up to 20x.
Resisted Range of Motion (Eversion):
- Wrap the resistance band around the your foot as you did for your Inversion exercise.
- This time, hold both ends of the band towards the inside of your foot (in this case, I was exercising my right foot, so I held the band in my left hand, out away on the left side of my body).
- Option A: If you are working on ankle stability and strengthening, pull your foot OUTWARDS (Eversion) into the resistance of the band, or in this case, towards the right. Vary the amount of plantarflexion and dorsiflexion (how much you are pointing your toes) while you do this. Repeat up to 50x.Option B: If you are strictly working on your toe pointe, you must first plantarflex or point your toe in a straight line continuing down from your shin, before you add the OUTWARDS (Eversion) contraction of your foot. Repeat your eversion repetitions whilst holding your strong toe pointe. Repeat up to 20x.
Foot Intrinsics (Interossei and Lumbricals):
- While sitting firmly, rest your foot flat on the floor.
- Press all of your toes of the foot firmly into the floor.
- Try to lift the arch of your foot up off the floor, without letting your toes curl or lift off the floor. Sometimes it helps to try to imagine that you are contracting the ball of your foot towards your heel.
- Hold your arched position for 5seconds, relax the arch and repeat again up to 10x.
Progress to doing this exercise while standing/weight bearing.
Next step: Mobility Exercises!
Next, for proper muscle balance, you must make sure you do mobility exercises in addition to your strengthening and stabilizing exercises.
For example, tight upper thighs (hip flexors and quads) can also create an obstacle for your point – if these are tight, then there will be more work and tension in your ankles. So be sure to add regular stretching and foam roller work to your hips and quads.
Quadriceps on a Foam Roller:

- Rest your thigh on top of the foam roller, and support yourself with your forearms. Be sure to keep your core tight to stabilize your spine.
You can roll anywhere above your knee to below your hips, pausing and breathing through any tender spots. Try and keep your quads relaxed when you’re using the foam roller. I like to let my toes drag (not shown) but you can add a little bit of extra support if toe drag is too much. If you want to increase intensity even further – try tilting left or right to target more areas of this large muscle group!
Plantar Release with a Lacrosse Ball:
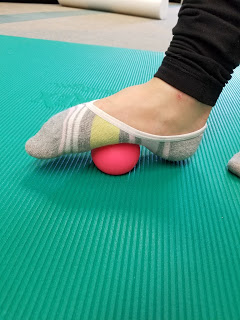
- Place the lacrosse ball on the ground and place the right foot on top of the ball.
- Put some pressure on the ball and move back and forth until you find a spot that is particularly tender. When you find a spot of tension, focus on that area and hold for about 15-20seconds. If it feels good, you can always hold longer (as long as this isn’t your first time doing this!).
You can work your way down from the ball of your foot towards your heel, over the arch, and over the side of the foot.
Finally, stretching is the final key for foot and ankle control. While many of the large muscle groups will also contribute to the overall flexibility of the legs and feet, we will go more into depth on how to stretch some of the other main muscle groups in future posts. For today, I’ve chosen a couple ways to target the muscles involved directly with the foot.
Passive Stretch – Plantarflexion:
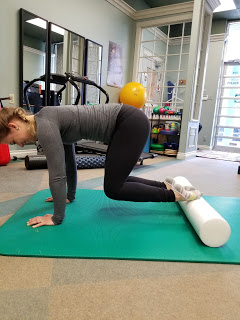
- Carefully, on your hands and knees, place the instep (the top part of your foot) on top of a foam roller behind you.
- A combination of rolling the foam roller away or walking your hands and body out, try to balance your weight on your instep and drop your knees towards the floor to increase the stretch (this may be the trickiest part of this stretch!). Hold 30sec, and repeat 4x.
Passive Stretch – Foot Arch
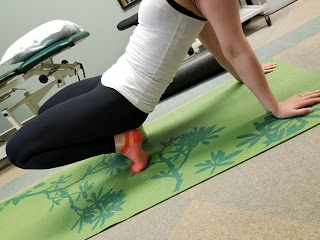
- Starting in a crouched or squat position, with your knees pointed forwards, put all the weight into the balls of your feet and lift your heels off the ground.
- Slowly bring your knees down in front towards the floor, ensuring that your toes and balls of the feet do not come up off the floor. You should begin to feel the stretch either in your toes of the arch of your foot. Hold for 30sec, and repeat 4x.
- To increase the intensity of this stretch, you can always lean your body back to increase the stretch into your quads (and eventually lie down on your back with your feet tucked underneath you).
Keep in mind these are just a few general exercises selected to start you on your toe point and stability journey. Remember, these exercises should never make you worse, and if you are unsure about your technique or having pain, discontinue and seek the advice of your physiotherapist.

